The electronic balances in this modern era operates on magnetic force restoration principle. The current required for opposing a weight’s downward motion in the magnetic area is measured by the detector. Checking about the accuracy includes performing testing for linearity, cornerload, reproducibility, and calibration. Precision measuring is a requirement in every kind of laboratories. The accuracy expanding from one part per million is normal region for the range of weights from one gram to one kilogram. Even for reagents preparation the need of high precise measuring and also analysis has been reduced. For accurate periodic verifying of mechanical pipettors, several laboratories utilize precision balances.

The operational principle of Laboratory Balances
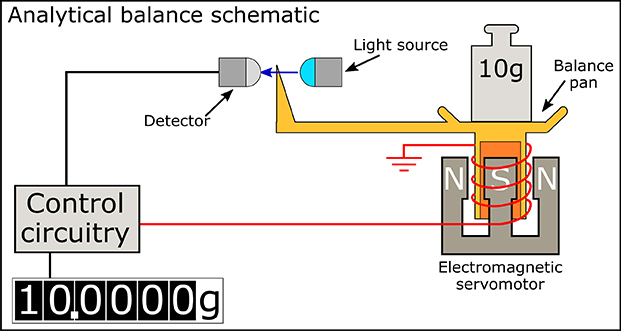
A modern laboratory balance working principle handles some of the similarity with its predecessor that is equal arm parity. Older device reflects not known weight torque exerted on one pivot side to adjusting known measurement on other side. So, when pointer returns the similar areas, there should be equal torques and measurement is identified by the moving weights position. This modern equivalence is known as magnetic force restoration. The substance exerting force that is being measured is handled by the electromagnet. The usual mechanism comprises of a wire coil that is suspended in the magnetic area. Since the magnetic field is normally adjusted relative with the coil. At every point, current flow direction and magnetic field direction are perpendicular to each other.
Therefore, force exerted is in axis direction of the coil. This wire coil will be sustained by springs of precision which enables it in moving in its axis direction. The coil position is detected by an optical sensor and offers a signal feedback to an electronic amplifier. An electronic amplifier immediately regulates in maintaining coil position at a reference point. Quantity of force that is exerted by wire coil is directly proportional to current flowing amount in it. Thus, by weighing that current, force exerted can be calculated. Equal arm balance will reflect two torques that are counteracting and leads to the needle deflection for making it returning to reference position. While the force restoration framework of electromagnetic restricts direct power applied by obscure against customizable. And realized straight power applied by loop at an explicit spatial point.
Examining Precision
A lab examination program needs inspection of analytical balance precision, it needs to be done every time. Mainly, when it is used for making weighed-in controls or analytical calibrators levelled substances. Also, when verifying pipette precision. Examining balance is familiar with subject of verifying any other analyses in laboratory. For testing of accuracy lab balance there are four components, reproducibility, linearity, calibration, and corner load.
Reproducibility:
It refers to the capacity of a device to deliver the similar measurements repeatedly read for a specific object. It is expressed in another way as standard deviation, which is regularly a promoted execution detail for a balance in a laboratory.
Linearity:
This is the highlight which will quantify during the intermediate reading along the entire measuring instrument range. The device weighing range is similar to the measurement range of analytical balance of a lab test. Because the balance in a laboratory will normally utilized in measuring little things than apparatus capability, this is a crucial characteristic.
Calibration:
This is defined as a weight reading comparison of provided mass level. This sort of weighing is normally performed at complete capability.
Cornerload:
These errors are in association with various regions present on object measuring pan that is being measured. A particular substance creates similar reading unconcerned with its place on measuring pan. This sort of problems is unlikely to be seen in clinical lab and is different to the analytical balance.

Process of inspecting the Precision Balance
Parity tests for exactness are like those performed in clinical research centre for examining expository tests accuracy. There are few contrasts in unwavering quality tests subtleties, since equalizations are exceptional mechanical gadgets.
Testing of reproducibility:
This testing involves more than once gauging a granted protest such as recording outcomes, and breaking down those outcomes. The weight of test is equivalent to a device gauging limit which ought to be chosen. Reading in twenty sets must be taken for informational indexes of two that is zero reading and full-scale reading. A point by point method is provided here.
- Tare the device for reading every one of the zeros and try not to include the underlying zero perusing.
- Keep the weight of test on the skillet and enter the displayed reading in marked segment as full-scale reading.
- Evacuate this measurement and include the perusing under zero reading.
- Rehash stages two and three until the lines one through twenty are altogether finished with readings.
- Interpret the two sections of numbers into a QM measurable program or spreadsheet.
- Utilize program in computing standard deviation and two sections of numbers coefficient of variety.
- Determined standard deviations bigger than permitted in details of apparatus demonstrate that it is either working in an unsteady situation or it is required to fix.
Testing of linearity:
This verification checks instrument precision at middle of the road weight estimations. Makers utilize the exactness expression in publicized details. This testing is extraordinary from linearity testing in clinical research facility where making an estimation of progression over the test AMR. This test estimates equalization capacity to precisely quantify an included weight when a non-measured measurement stack has been put on parity. The process is explained here.
- Utilize the two measurement weights, every weight is roughly one-a large portion of the instrument gauging limit. It’s basic that these two measurements are not to be exchanged inside this strategy, so allude the separate measurements as weight A and weight B.
- Make the display into Rezero and place the weight A on container. Then enter the readings on chart of linearity in a section pointed as zero to fifty percent.
- Expel the weight A and place it with B then close its skillet inside. Make Rezero the presentation with weight B on the skillet.
- Put A again on the weight pan with weight B on the skills. Then include the reading under the section marked as fifty percent to hundred percent.
- Ascertain the contrast between the two readings.
- The distinction ought not to be promoted resistance for linearity or precision. A typical mistake in this testing is to put weights of tests on gauging skillet and watch.
Distinction amid showed measurement and ostensible test weight estimation. This procedure neglects to represent the manner that test measurements are flawed. That the distinction among ostensible esteem and genuine measurement may be noteworthy. This is valid with diagnostic adjusts, where equalization might be more precise than any standard test weight. The strategy mentioned above invalidates these issues by looking at similar protest measurement readings with and without a preload. The test weight exactness is in this way unimportant.
Read More: Things to Understand While Buying a Laboratory Balance
Calibration
The apparatuses calibration is unique from model to model and maker to producer. This is a straightforward technique portrayed in the manual of client which accompanies the device. Numerous devices incorporate inward alignment weights. So, the calibration is as simple as pushing a solitary catch. The better way to understand that whether inner calibration measurement is correct or not is to have an outer standard for correlation. An outside standard benefit, regardless of whether it is utilized to adjust device or just to verify inner weight is that it can be inspected by a research center of calibration, also, followed to national gauges. Research centres have fitting class weights of ASTM for exactness testing. Institutionalized test measurements are made to different precision dimensions. The necessities of CAP’s for using suitable ASTM weights class are for calibration of high exactness diagnostic adjusts. The class two of ASTM weights are proper for adjusting high exactness top-stacking balances with readabilities from 0.001 to 0.01 gram.
The class three of ASTM weights are fitting for aligning moderate accuracy adjusts from 0.01 to 0.1 grams. The class one of ASTM is most precise class of measurement accessible. Most weights in class one is precise to 400,000 of one section. The microbalances are more precise as one may think about how standard measurement can be utilized to adjust investigative calibration. The appropriate response would be that standard measurement itself will be aligned by a research center which spends significant time in that benefit. The portrayal of weight by such a research center will decide real weight estimation to a lot higher to accuracy level than required by standard of ASTM. Such measurement can be used to check inward precision alignment weight.
In wake of putting a test weight on working device and finding that showed weight esteem does not coordinate test weight estimation. In any case, that end is in no way, shape or form except if test weight has been aligned and its remedy from ostensible esteem is known. The adjustment weights interior to superb research center balances are more precise than accessible test weights. In genuine adjustment information for explicit weights, clients ought to assume inward weights are exact than outside test weights. The class one of ASTM weights are less precise than scientific balances. Numerous top loading adjusts aligned utilizing class two weights for a similar reason. If equalization inner adjustment is more precise than stamped weight estimation then client should check equalization adjustment as portrayed beneath. For what reason is it required to play out adjustment checking, each time systematic gauges are checked for precision or not. The prerequisite does exist and research facilities must have documentation that checking has happened. Other recommendation is alignment confirmation which is alluded as precision.
Inspecting checklist of CAP:
- Pick five or six measurements over equalization AMR.
- Tare to make the balance display reading as zero.
- Measure all standard masses and enter screened measurement in record. Utilize similar weights from same one, set time every chance a test is done.
- Contrast observed measurements with the past ones.
- The outcomes are checked for fulfilment to know if there is any shift in observed measurements. If any weight is wrong then again measure it, and examine that there is no replacement from past verification of calibration.
Testing of cornerload:
This testing checks that the devices transfer similar measurement reading, although, where object being weighed is put on measuring pan. This testing requirements aren’t displayed. The usual tolerances are displayed as in T1.
- Pick a test measurement nearer to device measuring capability.
- Put test weight in weighing pan center then re zero the screen.
- Push the measurement one half path from center position to pan front edge. Then enter readings on chart of cornerload as Front.
- Again, do the step 3 for right, left, and read edges and enter the readings in available places on chart.
- The tolerances of cornerload are not advertised need element. T1 displays the devices typical tolerances working in industrial and lab situations.
The measurements of test must be handled properly, for getting incredible measuring precision, it must be done in the accepting situation or environment. The weighing exactness also get affected by the factor, temperature.
Conclusion
The high exactness lab balance is utilized less now than in past, when numerous investigative reagents, models, and calibrators were made as opposed to acquired. The lab balance is as yet a vital lab device. Occasional checking of exactness is an essential labs quality administration portion program. The methodology here is straight forward approaches to mind parity’s execution.
 FirstSource Laboratory Solutions Official Blog First Indian Scientific Online Shop


